Simulink ArduinoIO Package
Contents
In the majority of the hardware-based activities outlined within these tutorials, we will employ the ArduinoIO Package from the MathWorks for handling the interface between Simulink and our hardware. We use this package because it allows for rather transparent, real-time communication between Simulink and the Arduino Uno (and other models of Arduino board) without delving into the intricacies of serial communication. You can download the ArduinoIO Package here or from the MATLAB Central File Exchange.
Some Arduino boards (for example, the Mega 2560) can be communicated with while an experiment is running using the standard Arduino Hardware Support Package by running Simulink in External Mode. Details on this support package can be found here. Note R2014a or higher is needed.
The ArduinoIO Package that we will primarily be employing consists of a simple sketch program that runs on the Arduino board and a special blockset for Simulink. The program acts as a server for passing information between the hardware and the host computer running a Simulink model (which employs the specialized blocks). In these applications, any control logic that we develop in Simulink will run on the host computer. Together, these elements allow us to access Arduino digital inputs and outputs and analog inputs, and read encoders, all from Simulink (or the MATLAB command line).
In the case that we wish to create a standalone project that does not need to be connected to the host computer (for example, an autonomous mobile robot), we will then need to deploy our control logic to the Arduino. We can achieve this using the previously mentioned standard Arduino Hardware Support Package. In this case, the Arduino board won't be running a server program, but will rather be running a program that has been compiled into executable code from the Simulink model we created. Details can be found within the individual activities of the tutorial. Be aware, if you wish to run the Arduino board separate from the host computer, you will need to supply a separate power source for the board, i.e. a 9-Volt battery.
Getting started
Once you download and unzip the ArduinoIO package, you can start by taking a look at the included readme file. We will repeat some elements of the instructions here, but the readme file includes more detail.
Connecting to the Arduino Board
The first thing we need to do is to get our Arduino board up and running. Step-by-step instructions on how to connect the board to the host computer and how to download the driver for the board can be found here. This link also describes the Arduino development environment (IDE) and how to upload a test program to your board. The Arduino IDE consists of an editor that allows you to write programs (called sketches) and then build, compile, and upload executable code to your board. In general, we will only use the IDE to upload our server program.
Uploading the Server Program
The "server" program will run on the Arduino board in parallel with the Simulink model running on the host computer. The program runs continuously and receives commands from the Simulink model via the serial port. It then executes those commands and, if needed, returns a result. There are several versions of the program included as part of the IO package. We will, in particular, employ the sketch adioes.pde. This sketch performs analog and digital I/O (the "adio"), reads quadrature encoders (the "e"), and can interface with motors via a shield (the "s"). We will not employ a motor shield in the activities of this tutorial. Note that .pde is an older file extension and Arduino now uses the .ino extension.
The following instructions are needed to upload the adioes.pde file into the Arduino board's flash memory. As long as no other file is uploaded later, this step does not need to be repeated and the IO package can be used as soon as the board is connected to the host computer.
From the Arduino IDE toolbar menu, select File > Open and locate the file adioes.pde (in the ArduinoIO/pde/adioes folder) and open it. Next connect the Arduino board and make sure that the correct board and serial port are selected in the IDE (check menus Tools/Board: and Tool/Port:), then select File > Upload and wait for the "Done Uploading" message.

At this point the adioes.pde file is uploaded and you can close the IDE, which is not needed any longer for the purposes of this package. Closing the IDE is actually recommended in order to ensure that the serial connection to the Arduino board is not engaged by the IDE when MATLAB needs to use it.
Package Installation
Run MATLAB as an administrator (just one time for the purpose of installing the package) by right-clicking on the MATLAB icon and selecting Run as Administrator. This will allow the updated path to be saved. Then set the current MATLAB directory to the location of the file install_arduino.m (in the ArduinoIO/ folder). Finally, type install_arduino at the MATLAB command line to run the script. The script simply adds the relevant ArduinoIO folders to the MATLAB path and saves the path.
If you proceed to open Simulink, you will see the Library now includes the Arduino IO Library shown below. These blocks are used for interfacing with the physical Arduino board. For example, to read a sensor via an Analog Input or to switch an actuator on via a Digital Output.

A simple example
At this point, we will implement a simple example to demonstrate how to use the ArduinoIO package for interacting with an Arduino board via Simulink. In many of the examples of this tutorial we will specifically use the Arduino board to generate digital control commands (ON/OFF) to a given system (or its actuators). We will also use the Arduino board to read analog signals (voltages) from the system (or its sensors). In this simple example, we will blink a light (an LED) on and off.
Hardware setup
The circuit for this simple example consists of a resistor in series with an LED. The resistor is necessary to limit the current because otherwise the LED can burn out. An LED is a light emitting diode and, just like any diode, it passes current in only one direction (from the anode to the cathode). The LED "lights up" when activated.

To perform this activity, you will need the following equipment.
- Arduino board (e.g. Uno, Mega, etc.)
- USB cable
- Breadboard
- LED
- Resistor (and capacitor if you wish)
- Jumper wires
Our circuit can be implemented on a breadboard and connected to the Arduino board as shown. The particular resistance employed
is not important. Here we will use a  resistor as indicated by the color bands (red-red-brown for a four-band resistor). The orientation of an LED is indicated
by the location of a flat spot on the rounded bulb and by the length of its legs. Specifically, the flat spot indicates the
cathode (corresponding to the bar at the end of the triangle in the symbol for the LED). The cathode also corresponds to the
shorter of the two legs. The voltage source for the circuit comes from a Digital Output of the Arduino board (we will use pin 8).
Therefore, the example circuit can be created by connecting one end of your resistor to digital pin 8. The other end of the resistor is then connected to the longer leg of the LED. This can be achieved by placing the longer leg of the LED and the free end of the resistor in the same row of the breadboard. The shorter end of the LED is then connected to the ground pin of the Arduino board.
The Digital Output can generate two outputs, 0 Volts or 5 Volts. In this case, 5 Volts and the amount of current the board can source is sufficient to switch the LED on. In some other activities explored in these tutorials, a digital output does not provide sufficient power to drive a given system. In those cases, we can use the low power signal from a digital output to connect and disconnect a system to a higher power source (e.g. a battery) by, for example, switching a transistor. The Arduino board will also be used to measure the voltage across the LED via an Analog Input (pin AO). Therefore, we connect a jumper wire from pin AO to the junction where the resistor and LED meet. The other end of the LED is already connected to the ground pin of the board. In this example the voltage across the LED is not very interesting, but it at least illustrates how we will feed back signals from our various systems.

Software setup
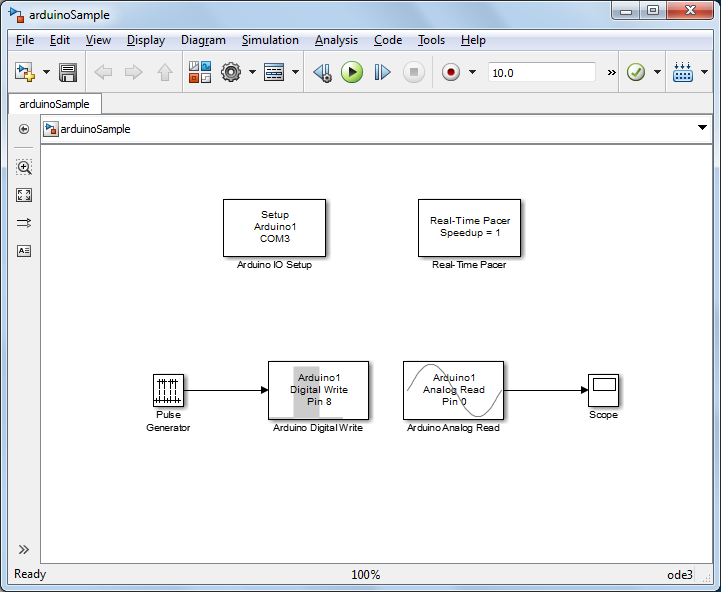
In this example, we will employ Simulink to generate the command that turns the LED on. We will also use Simulink to read voltage data from the board and to plot the data in real time. The Simulink model we will use is shown below and can be downloaded here. The Arduino Digital Write block, the Arduino Analog Read block, the Arduino IO Setup block, and the Real-Time Pacer block are all part of the IO package. The remaining blocks are part of the standard Simulink library. Specifically, the Pulse Generator block can be found under the Sources library and the Scope block can be found under the Sinks library.

Every model we create using the IO Package will include an IO Setup block and a Real-Time Pacer block. Double-clicking on the IO Setup block allows us to identify the Serial (COM) Port to which the Arduino board is connected. In this example, the board is connected to "COM3", though it may be different for you. You can identify the port to which your board is connected from the Control Panel of your computer (or from the Arduino IDE). We will always set the Speedup parameter of the Real-time Pacer block to "1" indicating that our Simulink model runs at the same pace as real time, that is, 1 second of simulation time corresponds to 1 second of physical time.
As shown, the input voltage command is generated by a Pulse Generator block. This block generates values of 0 or 1 which are then fed to an Arduino Digital Write block. Double-clicking on the Pulse Generator block you can set Sample Time to "0.1" seconds. We will further set the block so that it switches its output between its two states every 1 second (every 10 samples). Since we are using channel 8 for the digital output, we double-click on the Arduino Digital Write block to set the Pin to 8 from the drop-down menu. We will let the sample time for the block be inherited from the Pulse Generator block. An input of 0 to the Digital Write block causes an output of 0 Volts to be generated at the corresponding pin, while an input of 1 to the Digital Write block generates an output of 5 Volts.
The Arduino Analog Read block reads the output voltage data via the Analog Input A0 on the board. Double-clicking on the block allows us to set the Pin to 0 from the drop-down menu. We also set the Sample Time again to "0.1". The given Simulink model then plots the recorded data (the voltage across the LED) via a Scope block.
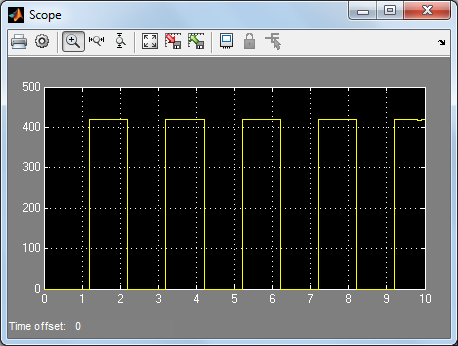
Once the Simulink model has been created, it can then be run from the drop-down menu Simulation > Run or by pressing the "play" button on the toolbar. The model we have created has been set to run for 10 seconds. When you run the model, you should see the LED alternately blink on and off. Double-clicking on the scope and pressing the Autoscale button on the toolbar then generates a graph like the one shown below.

The data that we have plotted here corresponds to the voltage across the LED. Since the LED and resistor are to good approximation
static devices, the voltage across the LED jumps almost instantaneously from zero to its non-zero value whenever the digital output
is switched "on". At this point the data is given in terms of bits. Since the Arduino board employs a 10-bit analog-to-digital
converter (ADC), the 0 to 5 Volt range of analog input is represented as integers from 0 to 1023 ( ). Therefore, the recorded data indicates that the LED has a voltage drop of approximately 2 Volts when turned on (
 Volts). This indicates that a "real" diode does have some resistance when it is forward biased, it does not behave like an
ideal short circuit.
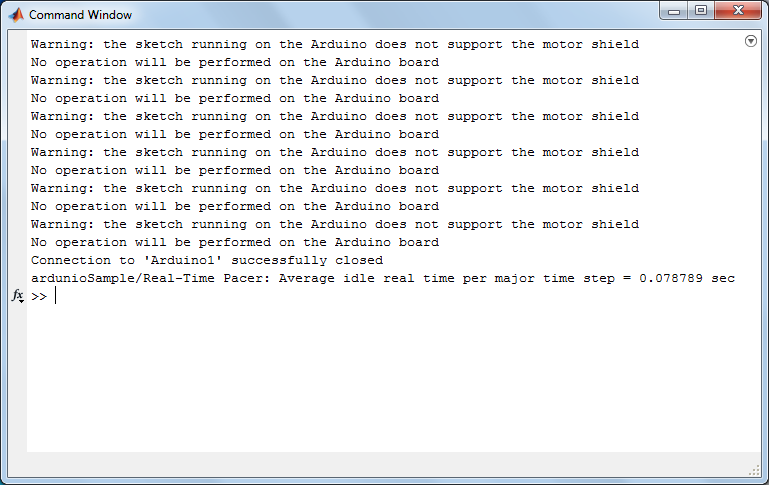
In this example, the sample time of 0.1 seconds that we are using is easily achievable by our system. There may be instances where you wish to perform more computation within Simulink, or where you may wish to use a smaller sample time because the dynamics of the signals you are reading are very fast. In these cases, you may attempt to use a sample time that cannot be consistently achieved. This can be a problem in particular because Simulink is running under a non-realtime operating system that is performing many other (higher-priority) tasks that may limit the speed with which Simulink is able to communicate with the Arduino board. One way to verify that the sampling time is being met is to look at the MATLAB command window after you run your Simulink model. If Simulink was able to meet the prescribed sampling time, at the command line you will find a report stating what the average idle time was per time step as shown below. If the model was not able to meet the timing requirements, such that there was no idle time, then this statement will be absent from the command line.

Extensions
Additional activities that could be performed include the following: You could read an external signal, for example from a pushbutton switch, and use that to determine when to turn the LED on or off. Alternatively, you could use a PWM signal (the Analog Output block) to vary the brightness of the LED. Finally, you could replace the LED by a capacitor in order to observe a dynamic, rather than a static, system. Such an RC circuit is examined in great detail in Activity 1 of this tutorial.


