Cruise Control: Simscape Modeling
Contents
Physical setup
In this section we alternatively show how to build the cruise control model using physical modeling blocks of Simscape Multibody. The blocks in the Simscape library represent actual physical components; therefore, complex multi-body dynamic models can be built without the need to build mathematical equations from physical principles as was done by applying Newton's laws in Cruise Control: Simulink Modeling.
The following figure shows the vehicle schematic along with the forces that are acting on it.
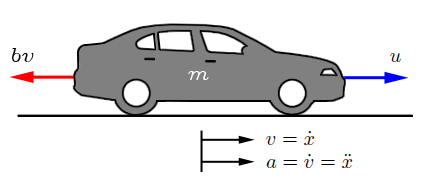
The system parameters are as follows:
(m) vehicle mass 1000 kg
(b) damping coefficent 50 N.s/m
(u) Force on the vehicle 500 N
(r) Desired speed 10 m/s
(Kp) Proportional control gain 800
(Ki) Integral control gain 40
Create a new model
Open a new Simscape Multibody model by typing smnew in the MATLAB command window. A new model, shown below, will open with a few commonly used blocks already in the model. The PS-Simulink and Simulink-PS blocks define the boundary between Simulink input/output models where the blocks are evaluated sequentially and Simscape models where the equations are evaluated simultaneously.
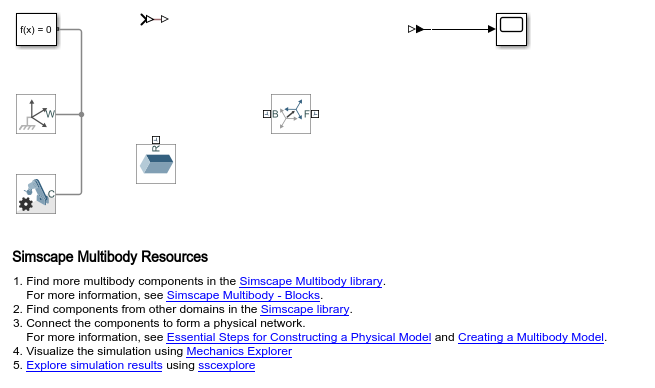
To configure the basic settings in the model:
- Double-click on the Mechanism Configuration block and set Gravity to "[0, 0, -9.81]". This represents an acceleration due to gravity of
 acting along the global -Z direction. This is good practice, but in this simulation is not essential.
- Open the Solver Configuration block and ensure that the Use local solver checkbox is not selected
- Type CTRL-E to open the Configuration Parameters dialog
- Ensure that the Solver uses the default "auto" setting, the Type is set to "Variable-step", and the Stop time to "120"
Define vehicle and degree of freedom
We will model the vehicle as a point mass moving along an axis. We use the World Frame to define the axis along which the vehicle will travel.
- Connect the B port of the Rigid Transform block to the W port of the World Frame
- Double-click on the Rigid Transform block
- In group Rotation, set Method to "Standard Axis", Axis to "+Y" and Angle to "90 deg"
- Rename the Rigid Transform block to "Transform Vehicle Axis"
Tips for adding blocks:
- Use Quick Insert to add the blocks. Click in the diagram and type the name of the block (use the letters in bold below). A list of blocks will appear and you can select the block you want from the list.
- After the block is entered, a prompt will appear for you to enter a parameter.
- To rotate a block or flip blocks, right-click on the block and select the desired option from the Rotate & Flip menu.
- To show the parameter below the block name, see Set Block Annotation Properties in the Simulink documentation.
Add the following blocks:
* Prismatic Joint
* Step
The Prismatic Joint allows only one translational degree of freedom. The Prismatic Joint will be actuated by a force input.
- Double-click on the Prismatic Joint to open the dialog box
- In group Internal Mechanics, set Damping Coefficient to "50 N/(m/s)"
- Under group Actuation, set the Force to "Provided by Input"
- In group Sensing, select Position and Velocity
- Rename the Prismatic Joint to "Prismatic Vehicle"
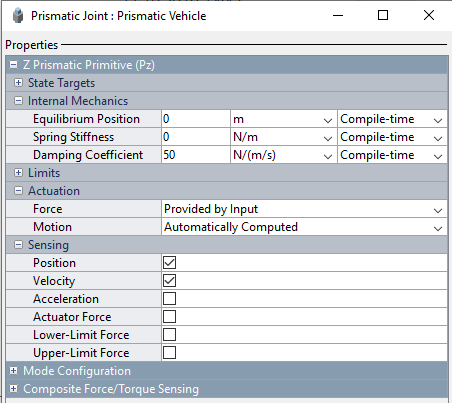
The Prismatic Joint then needs to be connected to the rest of the model.
- Connect the B port of Prismatic Vehicle to the F port of block Transform Vehicle Axis
- Connect the F port of Prismatic Vehicle to the R port of the Solid block
- Rename the Step block to "Force" and connect the output to the Simulink-PS Converter block that is already in the diagram
- Connect the output of the Simulink-PS Converter block to the force input of Prismatic Vehicle
- Double-click on the Simulink-PS Converter block and set Input signal unit to "N" for Newtons
- Make a copy of the PS-Simulink block
- Double-click on one PS-Simulink block and set Output signal unit to "m", and connect that block to the p port of the Prismatic Vehicle block
- Double-click on the other PS-Simulink block, set the Output signal unit to "m/s" and connect it to the v port of the Prismatic Vehicle block
- Connect both PS-Simulink blocks to the Scope
Since we are modeling the vehicle as a point mass, only the vehicle mass will affect the simulation results.
- Double-click on the Solid block
- Set parameter Dimensions to "[0.2,0.2,0.4]" so that the longest dimension points along the direction of travel
- In group Inertia, set Type to "Point Mass" and Mass to "1000 kg"
- Rename the block to "Vehicle"
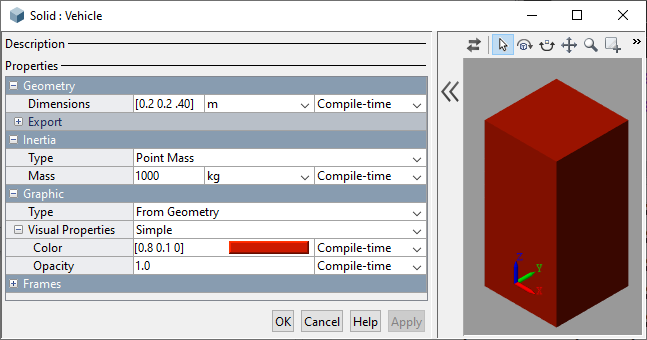
Your model should now appear as follows.

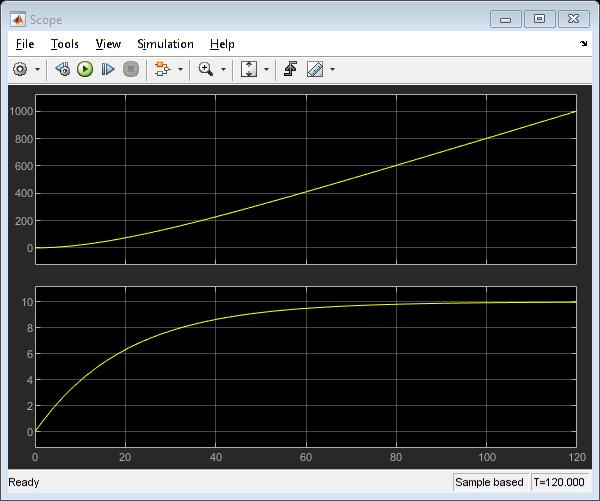
Then run the simulation (type CTRL-T or press the green arrow run button). The plot shows both the distance traveled by the vehicle and its speed.
Create a subsystem for the vehicle
We will put everything except the Force input and the Scope into a subsystem.
- Click once in the diagram (but not on a block) and press CTRL-A to select all blocks
- Hold the Shift key and click on the Force block and Scope to unselect those blocks
- Press CTRL-G to create a subsystem
- Rename the subsystem "Vehicle Subsystem"
- Double-click on the subsystem to enter it
- Rename the input port "Force" and the output ports "Position" and "Speed"

Controller design
Design a control loop for this model to simulate the cruise control system. The control task is to ensure the vehicle travels at a constant speed.
Add the following Simulink blocks:
- Step (you can copy/paste the Force block)
- Subtract
- PID Controller
- Manual Switch
- Scope
The switch lets you configure the model for closed-loop and open-loop operation. The goal of the controller is to hold the speed steady at 10 m/s.
- Rename the new Step block "Desired Speed"
- Set the Step time to "0", Initial value to "0" and Final value to "10"
- Open the PID Controller and choose the option to make it a PI controller
- Set the Proportional (P) gain to "800" and the Integral (I) gain to "40"
To close the loop:
- Connect the Desired Speed output to the + port of the Subtract block
- Connect the Speed output of Vehicle Subsystem to the - port of the Subtract block
- Connect the output of the Subtract block to the PI controller
- Connect the output of the PI block to one of the inputs of the manual switch
- Connect the Force (step input) to the other input of the switch
- Connect the switch output to the Force input of Vehicle Subsystem
- Connect the new Scope to the Position output and rename the Scope "Vehicle Position"
- Connect the Speed output and Desired Speed output to the original scope and rename it "Vehicle Speed"

Open-loop response
Double-click on the switch until the Force block is the selected input.

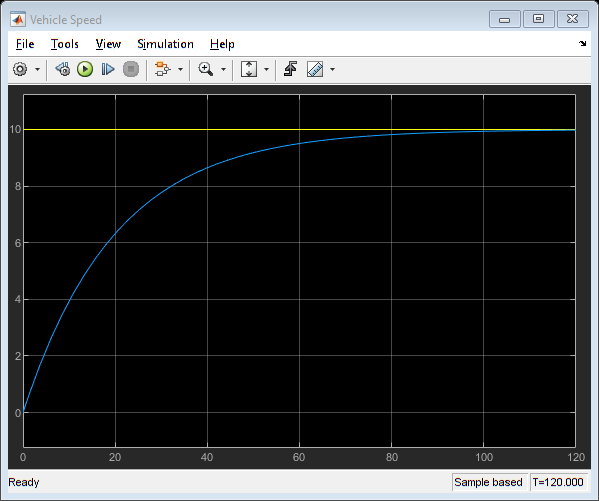
Run a simulation (type CTRL-T or press the green arrow run button). The vehicle speed rises from zero and eventually reaches a steady speed of 10 m/s.
Controlled-system response
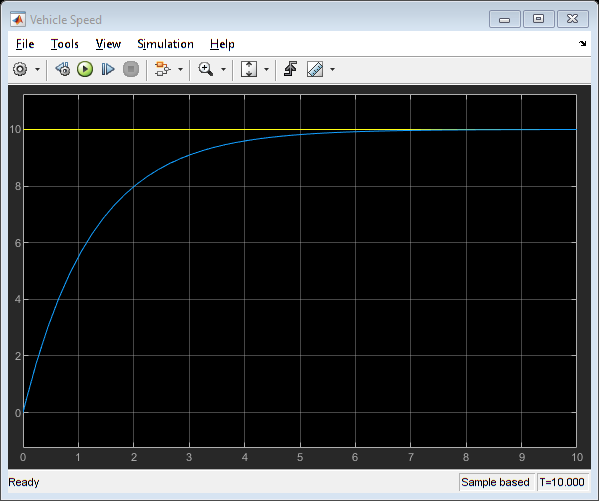
With the switch connected to the PI output, run the simulation (type CTRL-T or press the green arrow run button). The plot shows the controlled response of the system. The steady-state speed of 10 m/s is reached in a few seconds.
You can download the final Simscape model created here by right-clicking here and then selecting Save link as ....


